Reception Desk - Visitor Check-In and Check-Out
The visitor check-in and check-out process can be configured in a variety of different ways to meet the specific needs of each individual GUEST customer. Some high level examples of different options include:
-
Visitors may be required to scan an ID, or QR code from the visitor registration email.
-
They may have to acknowledge security policies, or sign an NDA.
-
They may be issued an access card, or a standard visitor badge with a barcode printed on it. At a high-level GUEST provides two ways for visitors to check-in:
- Visitors can check-in at the reception desk with the assistance of a “Visitor Management Officer”. This option makes use of the GUEST Reception tab within the application.
- Visitors can check-in at a Self-Registration Kiosk. The kiosk interface is typically deployed onto a mobile tablet with a touch screen, allowing visitors to check themselves in without any assistance.
GUEST also supports a combination of 1 and 2 above, where the visitor registers themselves at the kiosk and proceeds to the reception desk for final check-in.
General Overview:
GUEST Reception:
Access to the “Reception” tab in GUEST requires the Reception User Role. Even administrators of the system must have this role in order to access the Reception tab.
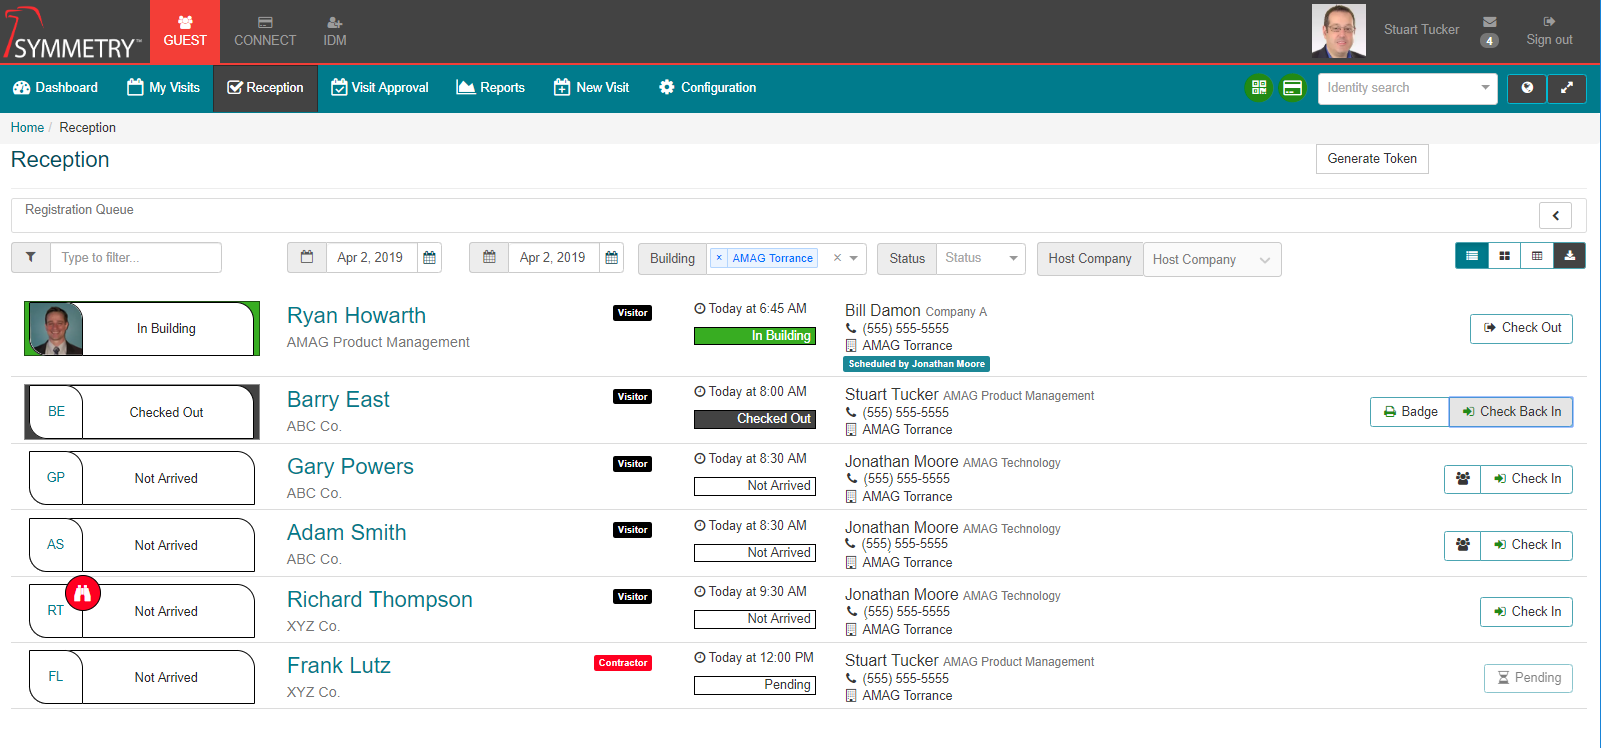
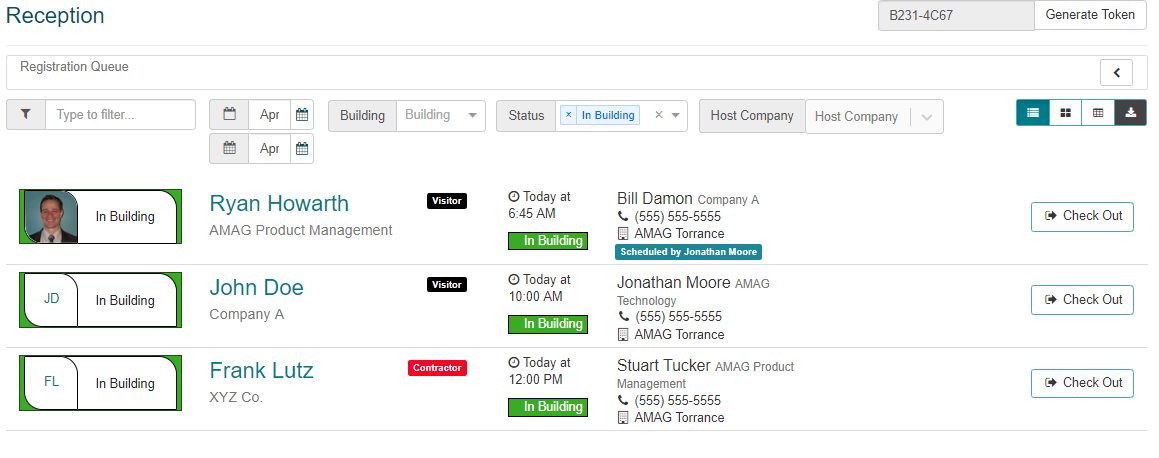
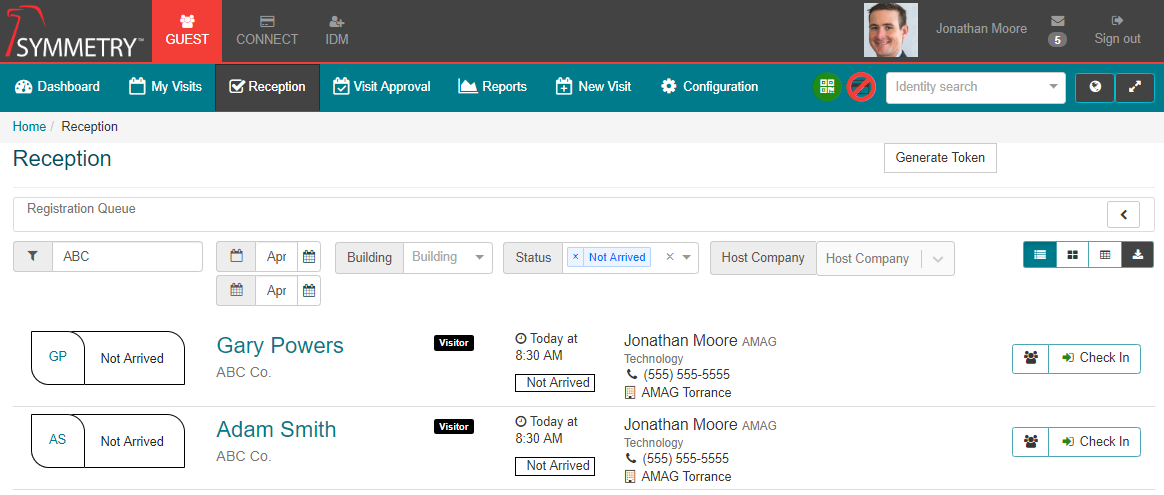
The GUEST Reception page allows users to view a list of all registered visitors that have not arrived, are currently checked-in, or have checked-out. The user is able to filter the list by date period, Building, Status (Not Arrived, In Building, Checked-Out etc.), or Host Company. The user can also search for the specific visitor by typing in the search box.
-
The screen above shows a list of visitors.
-
One visitor (Ryan Howarth) is “In Building” (currently checked-in).

-
A second visitor (Barry East) is currently checked-out.

-
The rest of the visitors have not arrived yet.
-
Most of the registered visitors were assigned a Visitor Type of “Visitor”. One visitor (Frank Lutz) is a “Contractor” (this visitor may have a different check-in process, or receive a different type of badge etc.)

-
“Ryan Howarth” was registered by “Jonathan Moore”, but the Host for the visit is “Bill Damon”. This is because Jonathan Moore registered this visit “On behalf of” Bill Damon (as a Host Delegate).

-
-
The visitor list can be filtered by a variety of options, including:
-
Date: Changing the date period will show the registered visitors for the selected date period.
-
Building: The user can filter the list to show the visitors registered for each specific Building. Please note that the Reception User will only be able to filter the list according to the Buildings assigned to them as part of user role configuration.
-
Status: The user can filter the list of visitors by status:
-
Not Arrived: Visitor is registered, but not checked-in yet.
-
In Building: Visitor is currently checked-in.
-
Checked-Out: Visitor is currently checked-out.
-
Pending: Visitor is registered but the visit is pending approval. The visitor cannot be checked-in until the visit has been approved.
-
Host Company: The list of visitors can be filtered according to the Company assigned to the Host.
-
-
-
The user can perform a manual search to find the visitor they are looking for. The search field will search on virtually any part of the visit (visitor name/company, host name/company etc.) and the results are displayed automatically.

- The user can change the default layout/view by selecting from the available view options, including: “List View”, “Grid View” and “Table View”.
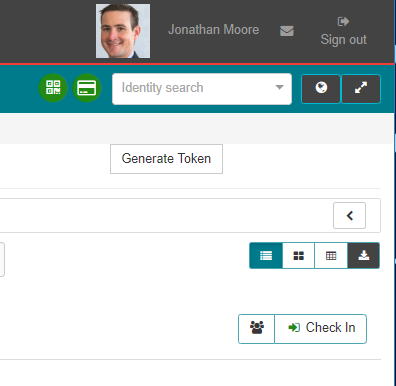
- Depending on configuration, specific icons may also be visible on the-right of the page.
| Object | Description |
|---|---|
 |
QR Code Scanner: Indicates a QR Code (barcode) scanner is configured for use with GUEST. QR Codes are typically included in the visitor registration email and can be scanned to locate the visitor record. |
 |
ID Scanner: Indicates that an ID Scanner (e.g. Driver’s License) is configured and connected to the local workstation. A visitor’s ID can be scanned to locate the visitor record, or to register the visitor without having to type their name. |
 |
ID Scanner Not Found: Indicates that an ID Scanner has not been found on the local workstation. |
 |
Identity Search: Global Identity search field. |
 |
Translation Icon: Used to manage language translations within the system (only visible to administrators). Only English language support is currently available. Additional languages will be added in future. |
 |
Full Screen: Allows the user to toggle between standard and full-screen mode. |
Basic Visitor Check-In:
To check-in a registered visitor via the GUEST Reception Tab:
-
Locate the visitor within the list (search, scan QR code, scan ID etc.).
-
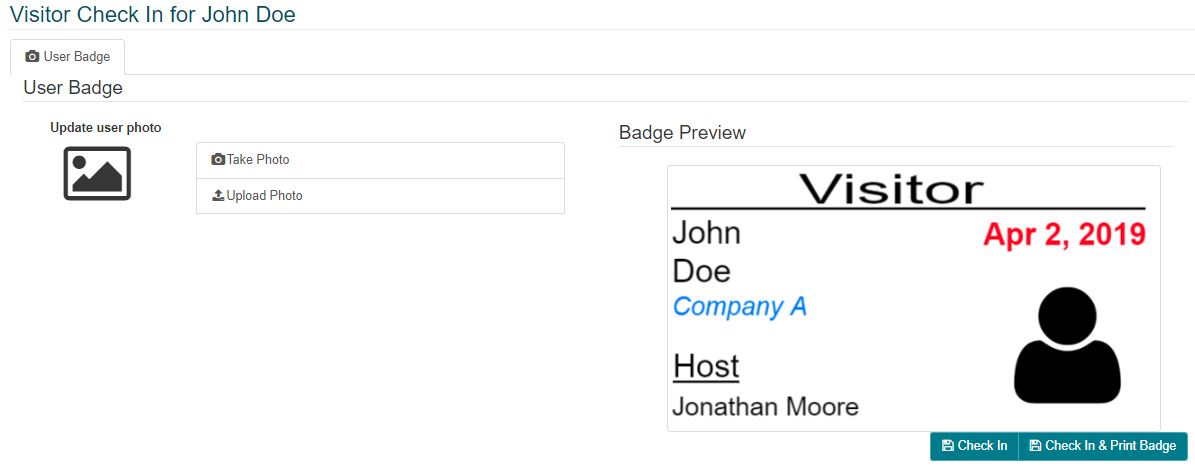
Click “Check In”.

-
In the most basic configuration, the user can capture a photo (this can be optional/required) and print a badge for the visitor during check in. The badge template is typically pre-selected based on the Visitor Type and Building.
-
If this is a returning visitor, their previous photo may be available for re-use.
GUEST supports most windows-compatible web-cameras and printers. Installation & configuration of recommended peripherals is covered in a separate document.
-
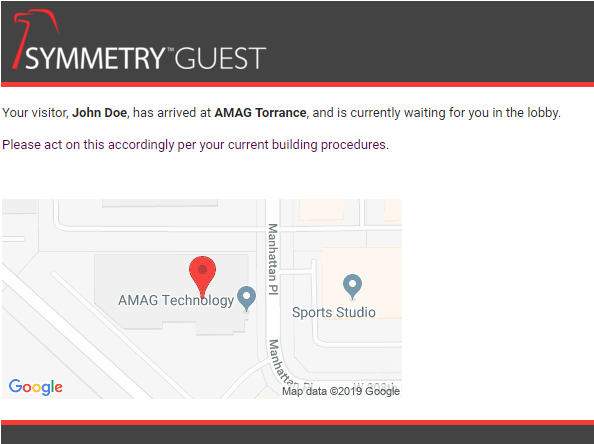
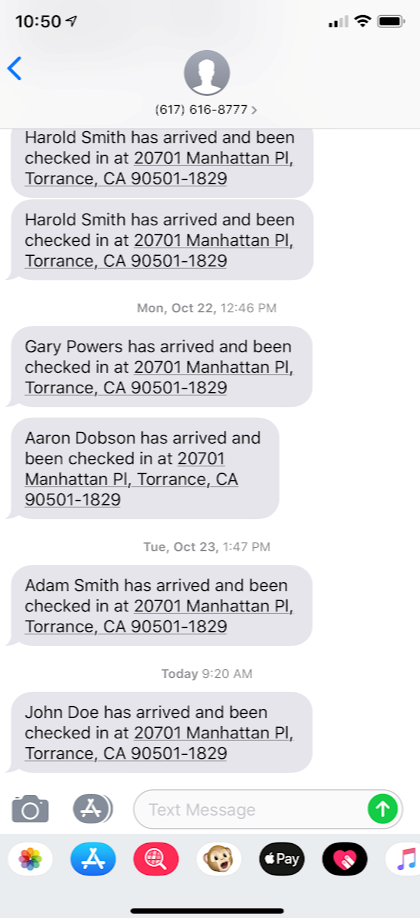
Once the visitor has been checked in, their status will change to “In Building”. The host typically receives an email and/or text message letting them know the visitor has arrived.

Additional Check-In Options:
The previous section describes the process for a basic visitor check-in. This section describes some additional features and functionality that may be available during the check-in process. These functions are all configurable options within the check-in process and are all available in the base system offering.
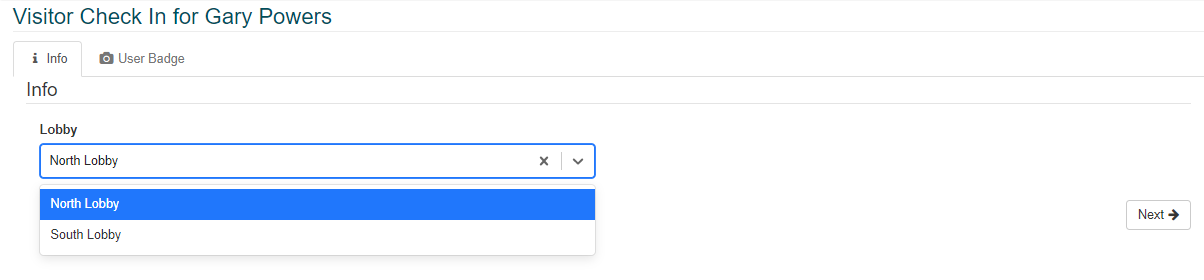
Lobbies:
If configured the Reception User will need to select the specific lobby where the visitor checked-in. This function is used for situations where a visitor may check-in at multiple lobbies and the specific lobby is unknown ahead of time.
-
During check-in the user will select the lobby. This field will keep the current selection for all future visits.
For more information please review the Lobbies section of this guide.
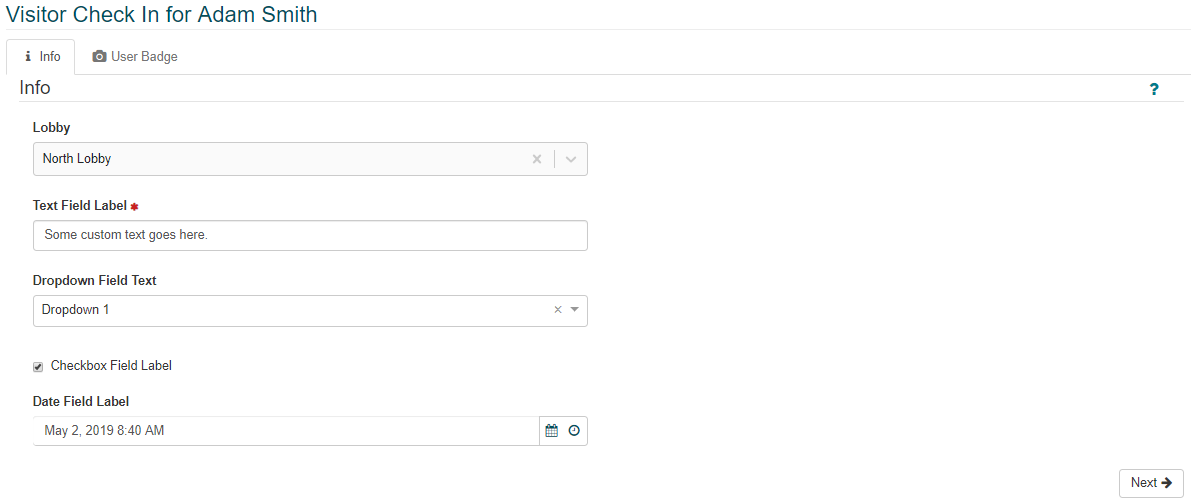
User Defined Fields:
An administrator may configure various User Defined Fields that may be required or optional during the check-in process. UDF’s may be used to capture a wide variety of “custom” data from the visitor. These fields may appear in a variety of different formats including text, drop down, check boxes, date and time etc.
- The user will need to complete any User Defined Fields as part of the standard check-in process.
For more information please review the User Defined Fields section of this guide.
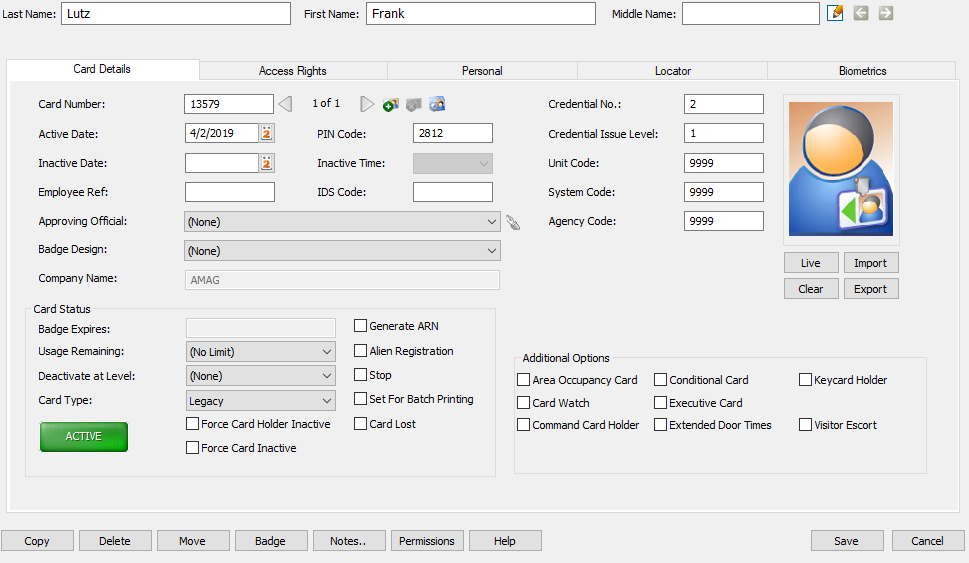
Symmetry Access Control Integration:
While not required, GUEST can be integrated with AMAG’s Symmetry SMS Access Control System, allowing visitors to be given an access card with limited access rights, according to the type and location of their visit.
During check-in a visitor can be issued an access card, or a barcode can be printed on their visitor badge. GUEST will push the visitor record (along with their access card/barcode and associated access rights) into Symmetry SMS, allowing them limited access within the facility.
GUEST will automatically remove the visitor from Symmetry SMS immediately when they are checked-out, ensuring that no visitor retains any level of access once they have left the facility.
-
If a specific Visitor Type is configured to provide access to a visitor, the user may be required to issue an access card to the visitor during check-in. The access card number can be entered manually, or a card reader can be used to read the number from the card.
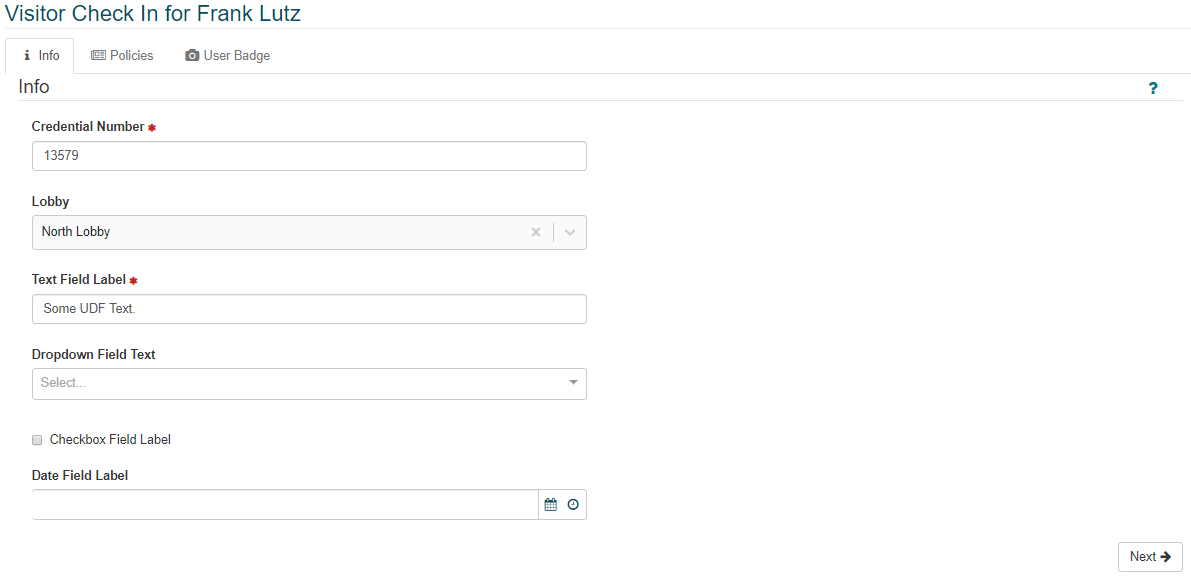
No action is required if a barcode is issued to the visitor instead of an access card. The barcode is printed on the visitor badge and pushed into Symmetry Access Control automatically.
For more information please review the Access Control section of this guide.
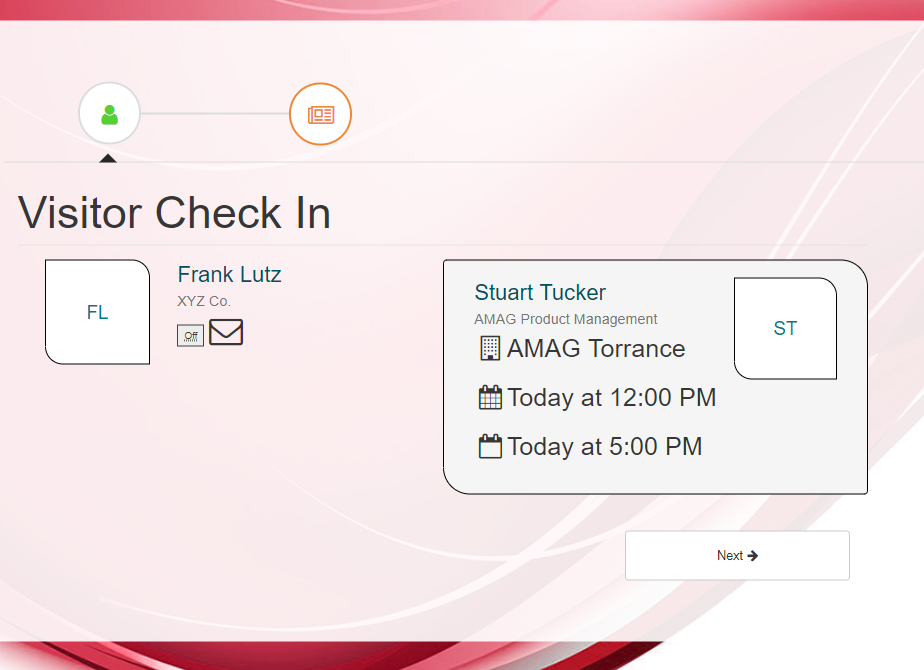
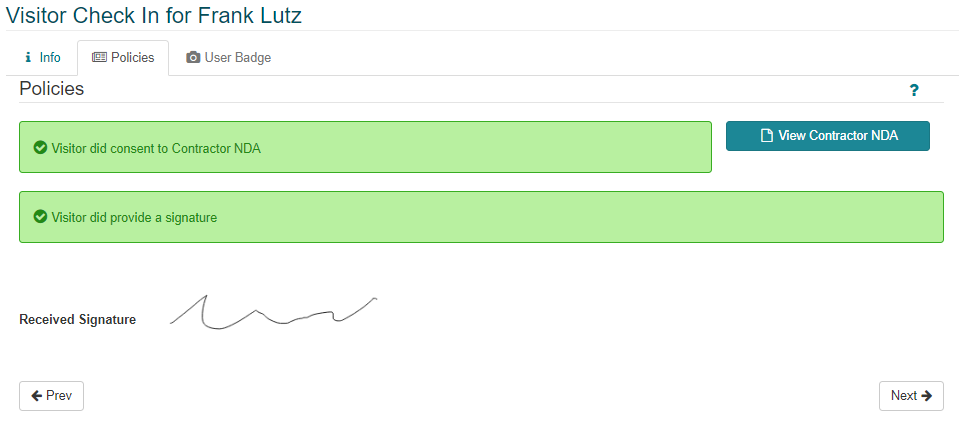
Visitor Policies & Guard Assist Portal:
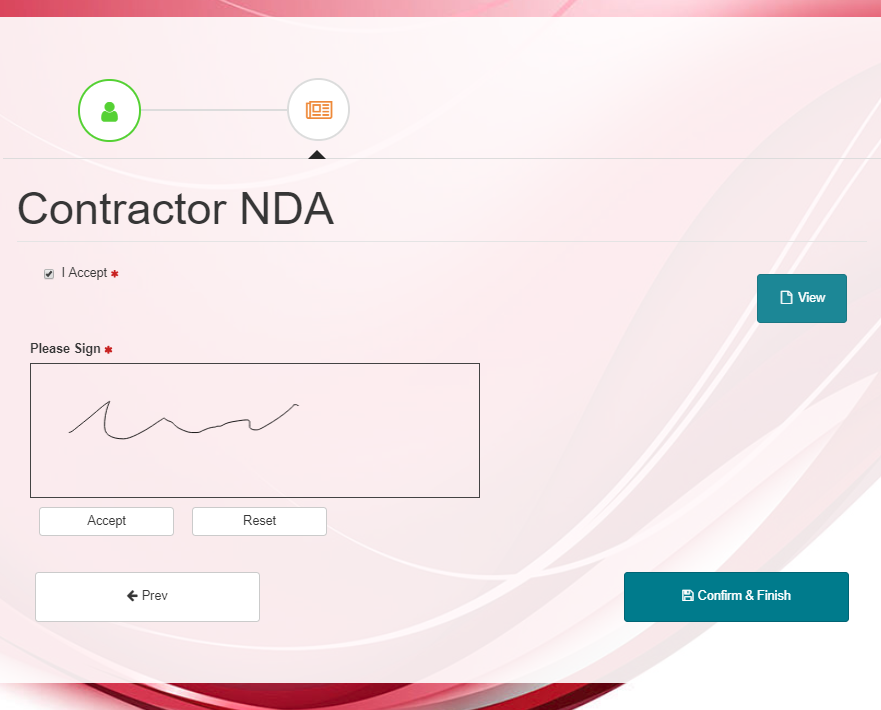
GUEST allows for policies (e.g. Non-Disclosure Agreements, Security Policies etc.) to be assigned to specific Visitor Types and Locations. When the relevant visitor checks in, they will need to acknowledge and/or sign the policies or they will not be able to check-in.
There are two options for completing visitor policies during the check-in process at the reception desk:
- User accepts acknowledgment of the policy on behalf of the visitor: This option allows the Visitor Management Officer to check a box indicating acceptance of the specific policy on behalf of the visitor.
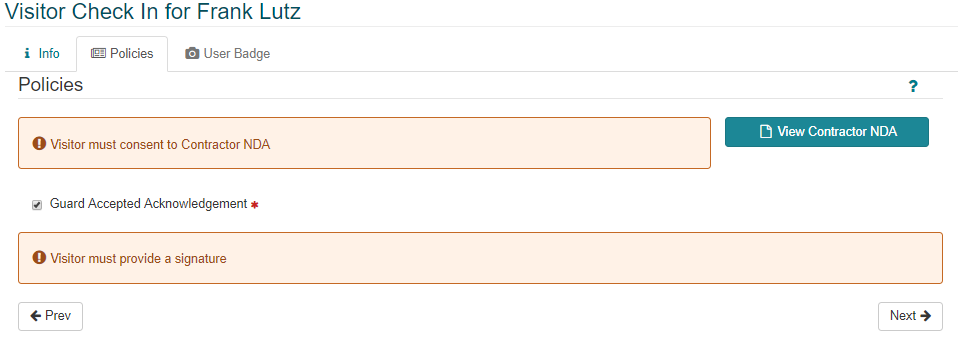
- Guard Assist Portal (Recommended Option): The visitor is able to view their visit details and policy documentation on a mobile tablet. They are able to review the documentation, then provide acknowledgment and/or signature in order to complete the process.
-
The user’s screen updates immediately to show the visitor’s signature and status of the policy documents. The user is now able to move on to the final stage of the check-in process.
For more information please review the Guard Assist Portal section of this guide.
Group Check-In:
If multiple visitors are registered as part of the same group, GUEST provides the option for “Group Check-In” (if enabled by an administrator).
-
Click on the Group Check-in button (next to the “Check In” button on the Reception page) to begin a Group Check-in.

-
The user has the option to “Check In All” visitors in the group, or to proceed with individual check in for each visitor.

GUEST will still ensure that all policies are met prior to checking in a visitor. If there is no additional data that needs to be captured, the system will automatically check-in each visitor, however if the visitor needs to sign a NDA, or have their photo captured, each visitor will need to be checked in individually.
More detail regarding group check-in configuration can be found in the System section of this guide.
Visitor Check-Out:
GUEST provides three options for checking-out visitors:
- Via the Reception Page: Visitors can be checked-out by users on the Reception page. It is easier to filter the list to see all visitors that are currently “In Building”, then click “Check Out” to check-out the specific visitor.
- The visitor status will update to “Checked Out” and the user has now has the option to check them back in and re-print their badge if required. This is very useful if a visitor leaves to go to lunch for example.

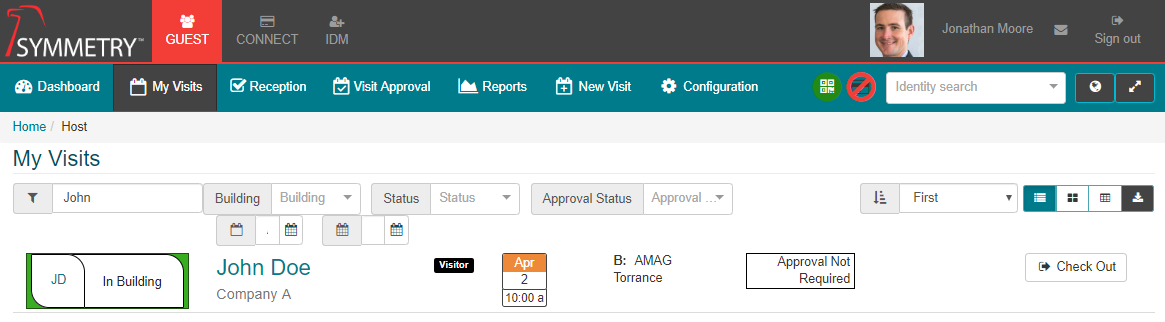
- Host Check-Out: A host user is able (if configuration allows) to check out their own visitors on the GUEST My Visits page.
- Automatically: GUEST supports the automatic check-out of visitors at the end of each day. The specific check-out time is configurable. Single and Multi-day visitors (visitors registered for more than one day) are configured separately, so single day visitors could be checked-out automatically, while multi-day visitors have to be checked out manually (as an example).
For more information regarding the configuration options for visitor check-out, please review the Checkout Settings section of this guide.
Registering a “Walk-in” Visitor:
An un-registered or “Walk-in” visitor needs to be registered by the reception user before they can be checked in. Reception users have access to the “New Visit” page and are able to register visitors as required. Reception users have an additional option, “Immediate Check In” which allows the visitor to be registered and then immediately begins the check-in process.
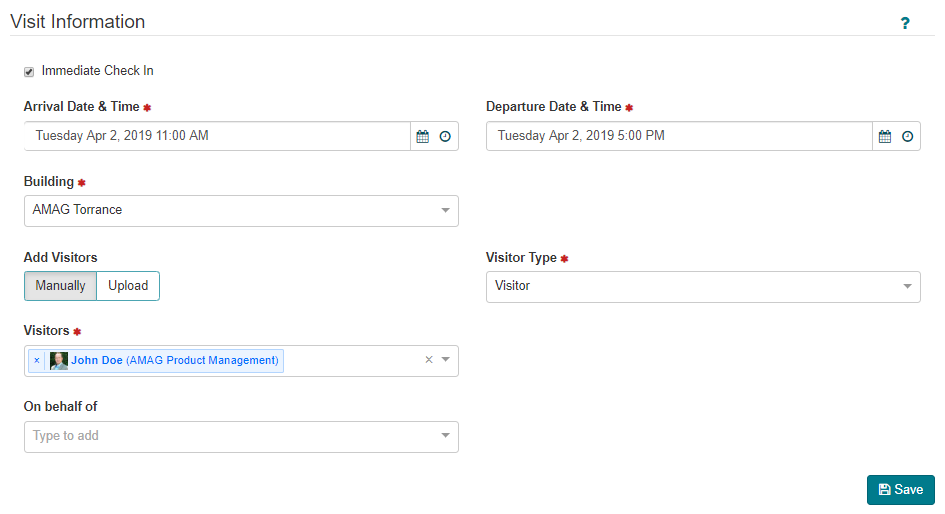
The rest of the visitor registration process is exactly the same process followed by regular host users. For more information please review the Visitor Registration section in this guide.
Editing Visits and Visitors:
Registered visits and visitors can be edited by reception users as follows:
Checked-in visits and visitors cannot be edited. Only visits/visitors that have not yet been checked-in can be edited.
-
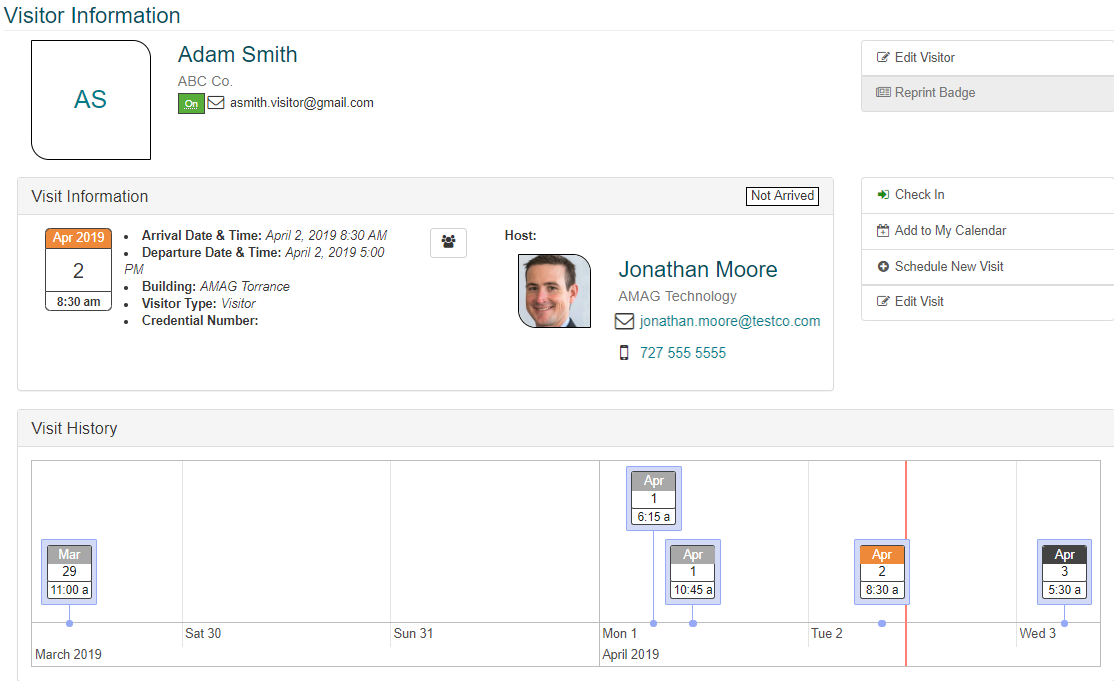
On the Reception page, click on the visitor name.
-
The user is presented with detailed information about the visit and visit, with the options to edit the information as required. A comprehensive “Visit History” is displayed at the bottom of the screen showing details about each previous (and upcoming) visit for the selected visitor.
Visitor Watchlist Management:
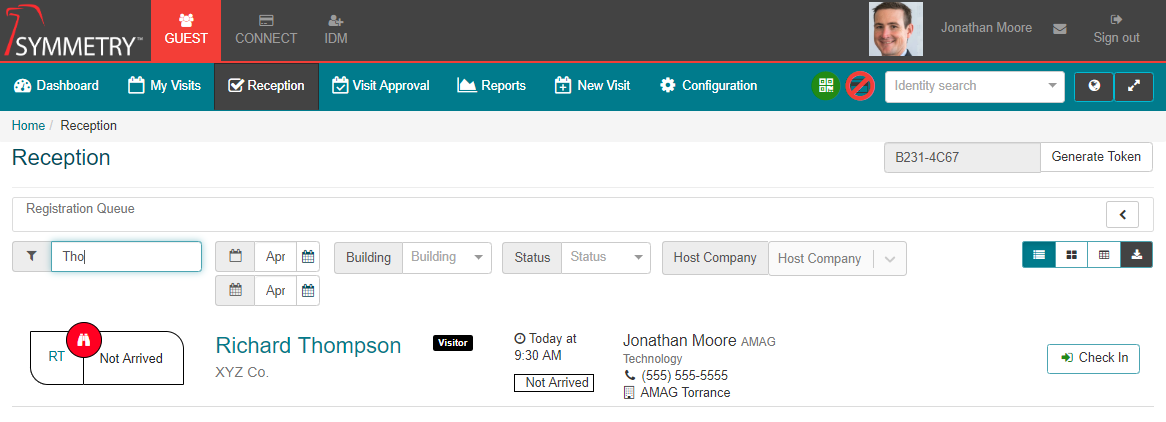
The GUEST application automatically checks all visitors against the internal Watchlist when they are registered. If a visitor matches an existing record on the Watchlist, the visitor is flagged on the Reception page with a visual indicator of the match. Typically, security users of the system are also notified of the match via email. The Watchlist is managed on the IDM tab of the application.

-
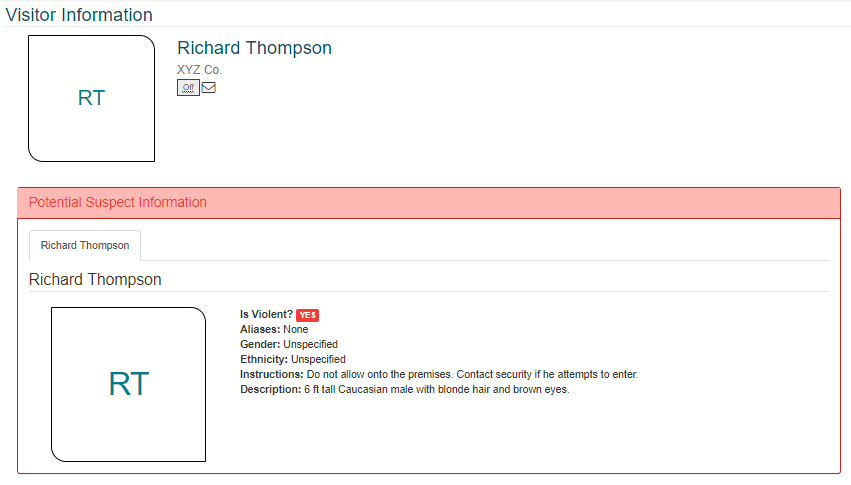
The above symbol indicates that the visitor matches a person on the Watchlist. Clicking the name of the visitor on the screen above will show more detail about the match.
-
A visitor that matches a record on the Watchlist can be checked in, however this requires an additional “override” step during check-in.
