Setting up Single-Sign On
The Connect & Guest Single Sign-On (SSO) service allows customers who are already using SSO to initiate a connection from their portals into the application and seamlessly allow their user base to connect without being challenged for username or password credentials.
The customer has the flexibility of choosing whether the use of SSO login is enforced; if this option is selected then access can only be granted to the system if the user has been validated by the customer. If this is not set to enforced a Mixed Mode is enabled which gives the user the ability to use the system with a separate password directly to the application or the convenience of SSO from the customers portal.
Vendor SAML Service Provider Details
<table>
<thead>
<tr class="header">
<th><strong>Metadata URL</strong></th>
<th><a href="https://xxxxx.symmetry.net/sso/saml/metadata">https://xxxxx.symmetry.net/sso/saml/metadata</a> (xxxxx refers to the customer specific sub-domain).</th>
</tr>
</thead>
<tbody>
<tr class="odd">
<td><strong>SAML Version</strong></td>
<td>2.0</td>
</tr>
<tr class="even">
<td><strong>Assertion Consumer URL</strong></td>
<td><a href="https://xxxxx.symmetry.net/sso/saml/assertionconsumerservice">https://xxxxx.symmetry.net/sso/saml/assertionconsumerservice</a> (xxxxx refers to the customer specific sub-domain).</td>
</tr>
<tr class="odd">
<td><strong>Attributes</strong></td>
<td><p>Email Address, Employee Number and Last Name.</p>
<p><strong>Note:</strong> Email Address or Employee Number can be supported on their own, but Last Name must be accompanied by Email Address or Employee Number.</p></td>
</tr>
<tr class="even">
<td><strong>Entity ID</strong></td>
<td><a href="file:///G:\Team%20Drives\Enterprise%20Solutions%20Product%20Management\CONNECT%20&%20GUEST%20Documentation\System%20Requirements%20and%20Peripherals\xxxxx.symmetry.net">xxxxx.symmetry.net</a> (xxxxx refers to the customer specific sub-domain).</td>
</tr>
<tr class="odd">
<td><strong>Signature Algorithm</strong></td>
<td><a href="https://www.w3.org/2001/04/xmldsig-more#rsa-sha256">https://www.w3.org/2001/04/xmldsig-more#rsa-sha256</a>.</td>
</tr>
</tbody>
</table>
xxxxx in the URLs should be replaced with your subdomain
Required Customer Information
<table>
<thead>
<tr class="header">
<th><strong>Customer SAML Identify Provider Certificate</strong></th>
<th><em>This can be uploaded within the application.</em></th>
</tr>
</thead>
<tbody>
<tr class="odd">
<td><strong>Single Sign On Service URL</strong></td>
<td><em>The location of the Customer Identity Provider SSO server where SAML authentication requests are sent.</em></td>
</tr>
<tr class="even">
<td><strong>Attributes</strong></td>
<td><p>Email Address, Employee Number and Last Name.</p>
<p><strong>Note:</strong> Email Address or Employee Number can be supported on their own, but Last Name must be accompanied by Email Address or Employee Number.</p></td>
</tr>
<tr class="odd">
<td><strong>Enforce Only SSO Login Allowed</strong></td>
<td>Yes / No.</td>
</tr>
</tbody>
</table>
SSO Setup (IDM Tab)
There are three steps to configuring SSO for Symmetry IDM:
- Configuring the Customer’s Identity Provider (IDP).
- Configuring the SSO Settings in IDM.
- Testing.
Configuring the Customer’s Identity Provider
This task will be handled by the customer however there are a few rules that must be followed:
- AMAG’s metadata file is required. This file can be obtained by going to the following URL: https://xxxxx.symmetry.net/amag.sso/api/sso/metadata
The metadata file will provide the information that will be required to set up the IDP.
- When configuring the IDP, an attribute containing at least the value of Email, or Employee Number that will be used to link the SAML message to an identity in IDM must be provided.
Though we must have either a value for Employee Number or Email, we can handle any combination of values for Email, Employee Number and Last Name.
- The attribute must have the following name value:
- For Email, the Attribute Name must equal: urn:oid:0.9.2342.19200300.100.1.3
- For Employee Number, the Attribute Name must equal: urn:oid:2.16.840.1.113730.3.1.3
- For Last Name, the Attribute Name must equal: urn:oid:2.5.4.4
Configuring the SSO Settings in IDM
To configure the SSO Settings in IDM (IDMConfigurationSSO Settings), the customer will need to provide a copy of their Metadata and Certificate. The Certificate must be a .cer file.
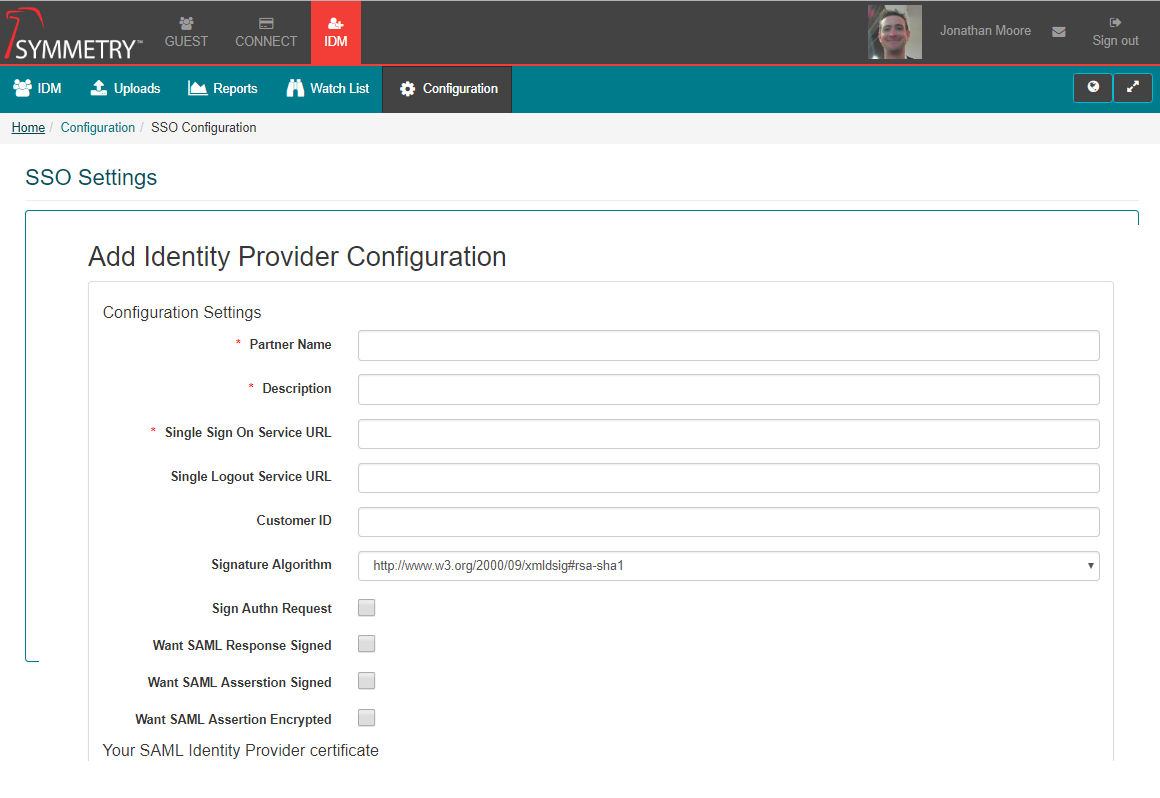
Once received we need to update the following fields by going to IDM -> Configuration -> SSO Configuration:
- Partner Name: This should be set to the entity id sent in the SAML message. This can be obtained from the metadata.
- Description: This is any description you want to give the connection.
- Single Sign ON Service URL: This is the URL that the customer will go to when logging in, this should be able to be obtained via the Metadata if not the customer will need to provide it.
- Your SAML Identify Provider certificate: This is where you upload the provided certificate file.
- Attributes: Check off which attribute they will be sending us.
Once all updates are made click ‘Save’.
Testing
We strongly recommend setting at least one account to Allow SSO Bypass while configuring SSO to prevent the risk of being locked out of your account. This can be done via the IDM tab once SSO has been enabled by the following steps:
- Select an Identity in IDM
- Select Login Credentials from the right-hand side
- Ensure Allow SSO Bypass is set to On
When testing, make sure that the identity used in testing has the relevant attribute configured. Also, if possible it is recommended to capture a SAML message being sent, this can be used to match against AMAG’s internal settings if any issues occur.
Common Issues:
- The Provider name is unknown – This likely indicates that the value for provider was entered incorrectly in the SSO Settings for IDM. To resolve use the value provided in the error message.
- The Attribute is not found – In this case the SAML message from the IDP either does not contain an attribute value or it is mislabelled. To resolve this AMAG will need a copy of the SAML message in order to determine which one it is.
Once SSO is enabled and configured users will have to log in using it by default. To provide a secondary access method you can enable a mix mode authentication by going:
- Go to the IDM Tab
- Select an Identity you wish to enable mix mode
- Select Login Credentials
- Select Allow SSO Bypass
Failure to allow SSO Bypass for at least one identity will result in an inability to login to the application if there is a problem with the SSO integration.